analitics

Pages

Showing posts with label pyopengl. Show all posts

Wednesday, August 29, 2018

PyOpenGL: Fix Attempt to call an undefined function glutInit .

This tutorial is about how to fix this error using Python version 3.6.4 :
OpenGL.error.NullFunctionError: Attempt to call an undefined function glutInit,
check for bool(glutInit) before calling
First I start with a common pip3.6 install.
Scripts>pip3.6.exe install PyOpenGL
Collecting PyOpenGL
  Downloading https://files.pythonhosted.org/packages/9c/1d/4544708aaa89f26c97cc
09450bb333a23724a320923e74d73e028b3560f9/PyOpenGL-3.1.0.tar.gz (1.2MB)
    100% |████████████████████████████████| 1.2MB 1.2MB/s
Building wheels for collected packages: PyOpenGL
  Running setup.py bdist_wheel for PyOpenGL ... done
  Stored in directory: C:\Users\catafest\AppData\Local\pip\Cache\wheels\6c\00\7f
\1dd736f380848720ad79a1a1de5272e0d3f79c15a42968fb58
Successfully built PyOpenGL
Installing collected packages: PyOpenGL
Successfully installed PyOpenGL-3.1.0
When I run my python script code I got this error:
c:\Python364\Scripts>cd ..
c:\Python364>python.exe opengl_001.py
Traceback (most recent call last):
  File "opengl_001.py", line 182, in 
    StereoDepth().main()
  File "opengl_001.py", line 173, in main
    glutInit()
  File "c:\Python364\lib\site-packages\OpenGL\GLUT\special.py", line 333, in glu
tInit
    _base_glutInit( ctypes.byref(count), holder )
  File "c:\Python364\lib\site-packages\OpenGL\platform\baseplatform.py", line 40
7, in __call__
    self.__name__, self.__name__,
OpenGL.error.NullFunctionError: Attempt to call an undefined function glutInit,
check for bool(glutInit) before calling
I use the whl files from here.
c:\Python364>cd Scripts

c:\Python364\Scripts>pip3.6.exe install PyOpenGL-3.1.2-cp36-cp36m-win_amd64.whl
Processing c:\python364\scripts\pyopengl-3.1.2-cp36-cp36m-win_amd64.whl
Installing collected packages: PyOpenGL
  Found existing installation: PyOpenGL 3.1.0
    Uninstalling PyOpenGL-3.1.0:
      Successfully uninstalled PyOpenGL-3.1.0
Successfully installed PyOpenGL-3.1.2

c:\Python364\Scripts>pip3.6.exe install PyOpenGL_accelerate-3.1.2-cp36-cp36m-win
_amd64.whl
Processing c:\python364\scripts\pyopengl_accelerate-3.1.2-cp36-cp36m-win_amd64.w
hl
Installing collected packages: PyOpenGL-accelerate
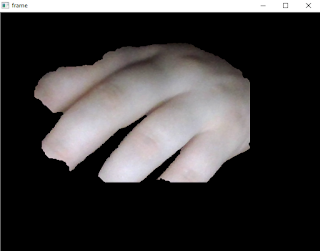
Successfully installed PyOpenGL-accelerate-3.1.2
This allow me to run well the python script with PyOpenGL python module.
This is result of shader stereo depth image:

Wednesday, November 30, 2016

OpenGL and OpenCV with python 2.7 - part 004.

Today I will continue the series of graphics processing in OpenGL and OpenCV.
The goal of this tutorial is the download and load into the python script of a youtube video.
To do that we need another two modules python.
First, I download and install the python 2.7.12 32 bit version from the internet.
C:\Python27>python.exe
Python 2.7.12 (v2.7.12:d33e0cf91556, Jun 27 2016, 15:19:22) [MSC v.1500 32 bit (
Intel)] on win32
Type "help", "copyright", "credits" or "license" for more information.

First update the pip tool and install numpy python module:
C:\Python27\Scripts>python -m pip install --upgrade pip
Collecting pip
Downloading pip-9.0.1-py2.py3-none-any.whl (1.3MB)
100% |################################| 1.3MB 419kB/s
Installing collected packages: pip
Found existing installation: pip 8.1.1
Uninstalling pip-8.1.1:
Successfully uninstalled pip-8.1.1
Successfully installed pip-9.0.1
C:\Python27\Scripts>pip install numpy
Collecting numpy
Downloading numpy-1.11.2-cp27-none-win32.whl (6.5MB)
100% |################################| 6.5MB 79kB/s
Installing collected packages: numpy
Successfully installed numpy-1.11.2

The main reason to have the numpy python module: it is often used with OpenCV python module.
For OpenCV python module installation you need to see my tutorial.
After you install it, test the OpenCV python module:
C:\Python27>python.exe
Python 2.7.12 (v2.7.12:d33e0cf91556, Jun 27 2016, 15:19:22) [MSC v.1500 32 bit (
Intel)] on win32
Type "help", "copyright", "credits" or "license" for more information.
>>> import cv2
>>> print cv2.__version__
3.0.0

Install pafy python module.
This module help you to download video from youtube but you need also the youtube-dl python module.
So let's install the youtube-dl and pafy python modules.
C:\Python27>cd Scripts
C:\Python27\Scripts>pip install youtube-dl
Collecting youtube-dl
Downloading youtube_dl-2016.12.1-py2.py3-none-any.whl (1.5MB)
100% |################################| 1.5MB 377kB/s
Installing collected packages: youtube-dl
Successfully installed youtube-dl-2016.12.1
C:\Python27\Scripts>pip install pafy
Collecting pafy
Downloading pafy-0.5.2-py2.py3-none-any.whl
Installing collected packages: pafy
Successfully installed pafy-0.5.2

I make a simple python script named: get_yt.py.
The source code of this script is simple:
import os
import pafy
# Download the video
video = pafy.new('https://www.youtube.com/watch?v=O5VCjktWVD4')
print "video.title"
print video.title
print "video.rating"
print video.rating
print "video.viewcount, video.author, video.length"
print video.viewcount, video.author, video.length
print "video.duration, video.likes, video.dislikes"
print video.duration, video.likes, video.dislikes
print "video.description"
print video.description
resolution = video.getbestvideo(preftype="mp4")
print "resolution"
print resolution
input_movie = resolution.download(quiet=False)
print "input_movie"
print input_movie
print "delete movie"
os.remove(input_movie)

I used the URL of a video clip from youtube channel of Arden Cho to tested.
If you want to keep the video into your folder just remove the last line from the python script.
The result is this output:
C:\Python27>python.exe get_yt.py
video.title
Can't Help Falling in Love With You - Arden Cho
video.rating
4.99041318893
video.viewcount, video.author, video.length
10980 ardenBcho 168
video.duration, video.likes, video.dislikes
00:02:48 1665 4
video.description
Recorded this song a couple months ago when I was in Boston, this song always reminds
me of holidays and love so sharing that with you!

Guitar by Koo Chung https://youtube.com/koochung
Violin and Video editing/production by Daniel Jang https://www.youtube.com/metal
sides
Production + Keys by Tim Bongiovanni https://www.northgateproductions.net
Filmed by Rob Mark https://www.instagram.com/rmarq_

If you like my music comment and SHARE! You can also support me by buying & rati
ng my album on iTunes!! https://itunes.apple.com/us/album/my-true-happy/id592588
859

You can follow me at: SnapChat: ardencho
http://www.instagram.com/arden_cho
http://www.facebook.com/hiardencho
http://www.twitter.com/arden_cho
http://www.imdb.me/ardencho
resolution
video:mp4@1920x1080
input_movie5 Bytes [100.00%] received. Rate: [5371 KB/s]. ETA: [0 secs]
Can't Help Falling in Love With You - Arden Cho.mp4
delete movie


Thursday, September 8, 2016

OpenGL and OpenCV with python 2.7 - part 003.

If you have seen the last tutorial about OpenCV, then this tutorial comes to complete with one source code.
This source code will cut the background of webcam.
The webcam output is take by VideoCapture function.
This part of source code: np.zeros((1,65),np.float64) will return a new array of given shape and type, filled with zeros.
The result of this parts is used with function grabCut from cv2 python module.
This is the source code:

import numpy as np
import cv2
cap = cv2.VideoCapture(0)
while(True):
    ret, img = cap.read()
    #img = cv2.imread('test002.jpg')
    mask = np.zeros(img.shape[:2],np.uint8)

    bgdModel = np.zeros((1,65),np.float64)
    fgdModel = np.zeros((1,65),np.float64)

    rect = (50,50,450,290)
    cv2.grabCut(img,mask,rect,bgdModel,fgdModel,5,cv2.GC_INIT_WITH_RECT)

    mask2 = np.where((mask==2)|(mask==0),0,1).astype('uint8')
    img = img*mask2[:,:,np.newaxis]
    cv2.imshow('frame',img)
    if 0xFF & cv2.waitKey(5) == 27:
        break
cap.release()
cv2.destroyAllWindows()
The end result will be something like:

Saturday, June 25, 2016

OpenGL and OpenCV with python 2.7 - part 002.

I deal today with opencv and I fix some of my errors.
One is this error I got with cv2.VideoCapture. When I  try to used with load video and createBackgroundSubtractorMOG2() i got this:

cv2.error:   C:\builds\master_PackSlaveAddon-win64-vc12-static\opencv\modules\highgui\src\window.cpp:281:  error: (-215) size.width<0 amp="" cv::imshow="" function="" i="" in="" size.height="">
You need also to have opencv_ffmpeg310.dll and opencv_ffmpeg310_64.dll into your Windows C:\Windows\System32, this will help me to play videos.
Now make sure you have the opencv version 3.1.0 because opencv come with some changes over python.
C:\Python27\python
Python 2.7.8 (default, Jun 30 2014, 16:08:48) [MSC v.1500 64 bit (AMD64)] on win32
Type "help", "copyright", "credits" or "license" for more information.
>>>import cv2
>>>print cv2.__version__
3.1.0

You can take some infos from about opencv python module - cv2 with:

>>>cv2.getBuildInformation()
...
>>>cv2.getCPUTickCount()
...
>>>print cv2.getNumberOfCPUs()
...
>>>print cv2.ocl.haveOpenCL()
True

You can also see some error by disable OpenCL:

>>>cv2.ocl.setUseOpenCL(False)
>>>print cv2.ocl.useOpenCL()
False

Now will show you how to use webcam gray and color , and play one video:
webcam color

import numpy as np
import cv2
cap = cv2.VideoCapture(0)
while(True):
    ret, frame = cap.read()
    cv2.imshow('frame',frame)
    if 0xFF & cv2.waitKey(5) == 27:
        break
cap.release()
cv2.destroyAllWindows()

webcam gray

import numpy as np
import cv2
cap = cv2.VideoCapture(0)
while(True):
    ret, frame = cap.read()
    gray = cv2.cvtColor(frame, cv2.COLOR_BGR2GRAY)
    cv2.imshow('frame',gray)
    if 0xFF & cv2.waitKey(5) == 27:
        break
cap.release()
cv2.destroyAllWindows()

play video

import cv2
from cv2 import *
capture = cv2.VideoCapture("avi_test_001.avi")
while True:
    ret, img = capture.read()
    cv2.imshow('some', img)
    if 0xFF & cv2.waitKey(5) == 27:
        break
cv2.destroyAllWindows()


Wednesday, June 22, 2016

OpenGL and OpenCV with python 2.7 - part 001.

First you need to know what version of python you use.
C:\Python27>python
Python 2.7.8 (default, Jun 30 2014, 16:08:48) [MSC v.1500 64 bit (AMD64)] on win32
Type "help", "copyright", "credits" or "license" for more information.
>>>

You need also to download the OpenCV version 3.0 from here.
Then run the executable into your folder and get cv2.pyd file from \opencv\build\python\2.7\x64 and paste to \Python27\Lib\site-packages.
If you use then use 32 bit python version then use this path: \opencv\build\python\2.7\x86.
Use pip to install next python modules:
C:\Python27\Scripts>pip install PyOpenGL
...
C:\Python27\Scripts>pip install numpy
...
C:\Python27\Scripts>pip install matplotlib
...

Let's see how is working OpenGL:
C:\Python27>python
Python 2.7.8 (default, Jun 30 2014, 16:08:48) [MSC v.1500 64 bit (AMD64)] on win32
Type "help", "copyright", "credits" or "license" for more information.
>>> import OpenGL
>>> import numpy
>>> import matplotlib
>>> import cv2
>>> from OpenGL import *
>>> from numpy import *
>>> from matplotlib import *
>>> from cv2 import *

You can also use dir(module) to see more. You can import all from GL, GLU and GLUT.
>>> dir(OpenGL)
['ALLOW_NUMPY_SCALARS', 'ARRAY_SIZE_CHECKING', 'CONTEXT_CHECKING', 'ERROR_CHECKING', 'ERROR_LOGGING', 'ERROR_ON_COPY', 'FORWARD_COMPATIBLE_ONLY', 'FULL_LOGGING', 'FormatHandler', 'MODULE_ANNOTATIONS', 'PlatformPlugin', 'SIZE_1_ARRAY_UNPACK', 'STORE_POINTERS', 'UNSIGNED_BYTE_IMAGES_AS_STRING', 'USE_ACCELERATE', 'WARN_ON_FORMAT_UNAVAILABLE', '__builtins__', '__doc__', '__file__', '__name__', '__package__', '__path__', '__version__', '_bi', 'environ_key', 'os', 'plugins', 'sys', 'version']
>>> from OpenGL.GL import *
>>> from OpenGL.GLU import *
>>> from OpenGL.GLUT import *
>>> from OpenGL.WGL import *

If you are very good with python OpenGL module then you can import just like this example:
>>> from OpenGL.arrays import ArrayDatatype
>>> from OpenGL.GL import (GL_ARRAY_BUFFER, GL_COLOR_BUFFER_BIT,
... GL_COMPILE_STATUS, GL_FALSE, GL_FLOAT, GL_FRAGMENT_SHADER,
... GL_LINK_STATUS, GL_RENDERER, GL_SHADING_LANGUAGE_VERSION,
... GL_STATIC_DRAW, GL_TRIANGLES, GL_TRUE, GL_VENDOR, GL_VERSION,
... GL_VERTEX_SHADER, glAttachShader, glBindBuffer, glBindVertexArray,
... glBufferData, glClear, glClearColor, glCompileShader,
... glCreateProgram, glCreateShader, glDeleteProgram,
... glDeleteShader, glDrawArrays, glEnableVertexAttribArray,
... glGenBuffers, glGenVertexArrays, glGetAttribLocation,
... glGetProgramInfoLog, glGetProgramiv, glGetShaderInfoLog,
... glGetShaderiv, glGetString, glGetUniformLocation, glLinkProgram,
... glShaderSource, glUseProgram, glVertexAttribPointer)

Most of this OpenGL need to have a valid OpenGL rendering context.
For example you can test it with WGL ( WGL or Wiggle is an API between OpenGL and the windowing system interface of Microsoft Windows):
>>> import OpenGL
>>> from OpenGL import *
>>> from OpenGL import WGL
>>> print WGL.wglGetCurrentDC()
None

Now , let's see the OpenCV python module with s=one simple webcam python script:
import numpy as np
import cv2
cap = cv2.VideoCapture(0)
while(True):
    ret, frame = cap.read()
    gray = cv2.cvtColor(frame, cv2.COLOR_BGR2GRAY)
    cv2.imshow('frame',gray)
    if cv2.waitKey(1) & 0xFF == ord('q'):
        break
cap.release()
cv2.destroyAllWindows()
This is result of my webcam:


Tuesday, December 11, 2012

Using pip for installing and managing Python packages.

An easy_install replacement is pip.

So pip installs packages and managing Python packages.

Let's try to install packages.

$ pip install PyOpenGL_accelerate
bash: pip: command not found 

Install the pip package.

The recommended way to use pip is within virtualenv, since every virtualenv has pip installed in it automatically.

[free-tutorials@free-tutorials ~]$ 
curl -O https://raw.github.com/pypa/virtualenv/master/virtualenv.py
...
[free-tutorials@free-tutorials ~]$ python virtualenv.py my_new_env
New python executable in my_new_env/bin/python
Installing setuptools............................done.
Installing pip.....................done.
[free-tutorials@free-tutorials ~]$ . my_new_env/bin/activate
(my_new_env)[free-tutorials@free-tutorials ~]$ pip --help

Let's try again with PyOpenGL and PyOpenGL_accelerate packages.

(my_new_env)[free-tutorials@free-tutorials ~]$
 pip install PyOpenGL PyOpenGL_accelerate
Downloading/unpacking PyOpenGL
  Downloading PyOpenGL-3.0.2.tar.gz (891kB): 891kB downloaded
  Running setup.py egg_info for package PyOpenGL
      ....
      

Now we can test this two packages.First is PyOpenGL.

(my_new_env)[free-tutorials@free-tutorials ~]$ python 
Python 2.7.3 (default, Dec  6 2012, 03:02:26) 
[GCC 4.3.2 20081105 (Red Hat 4.3.2-7)] on linux2
Type "help", "copyright", "credits" or "license" for more information.
>>> import OpenGL
>>> dir(OpenGL)

...and PyOpenGL_accelerate:

(my_new_env)[free-tutorials@free-tutorials ~]$ python 
Python 2.7.3 (default, Dec  6 2012, 03:02:26) 
[GCC 4.3.2 20081105 (Red Hat 4.3.2-7)] on linux2
Type "help", "copyright", "credits" or "license" for more information.
>>> import OpenGL_accelerate
>>> dir(OpenGL_accelerate)

This is working only on my_new_env.

That is all for now. I will try to do some examples with this packages.

Monday, March 1, 2010

Python and OpenGL - first steps

First you need to install python .
Second you need to install pyopengl module.
This is easy if we use some linux distributions.
On Fedora we can use command yum.
On Debian and Ubuntu we can use apt-get.
At last we need some basicaly examples.
We can get some examples from:PyOpenGL-Demo
But this is not all we will need more.
To go on next step we will need to read OpenGL specifications.
Try to use search on internet to see more about OpenGL.