analitics

Pages

Showing posts with label pip. Show all posts

Saturday, January 28, 2023

Python : Fix error with pip and pylupdate6.exe .

I try to upgrade the PyQt6 package and I got this error:

pip3 install --upgrade --force-reinstall PyQt6
...
ERROR: Could not install packages due to an OSError: [WinError 2] The system cannot find the file specified:
...pylupdate6.exe
...pylupdate6.exe.deleteme'
I think this solution will work for any python package
Open a command shell run as administrator and run it again:
pip3 install --upgrade --force-reinstall PyQt6
Collecting PyQt6
...
Successfully installed PyQt6-6.4.1 PyQt6-Qt6-6.4.2 PyQt6-sip-13.4.1
If you want to re-download the packages instead of using the files from your pip cache, then use:
pip install --force-reinstall --no-cache-dir

Tuesday, January 24, 2023

Python : Fix DLL load failed while importing ...

This error DLL load failed while importing ... can have many causes like conflicts with the already installed packages, and also it can break your current environment.
>>> import PyQt6
>>> from PyQt6.QtCore import QUrl
Traceback (most recent call last):
  ...
ImportError: DLL load failed while importing QtCore: The specified module could not be found.
You can see I used to reinstall the PyQt6 python package with this argument --ignore-installed:
pip3 install PyQt6 --user --ignore-installed
Collecting PyQt6
  ...
Installing collected packages: PyQt6-Qt6, PyQt6-sip, PyQt6
  WARNING: The scripts pylupdate6.exe and pyuic6.exe are installed in
  ...
  which is not on PATH.
  Consider adding this directory to PATH or, if you prefer to suppress this warning, use --no-warn-script-location.
Successfully installed PyQt6-6.4.0 PyQt6-Qt6-6.4.2 PyQt6-sip-13.4.0
The --ignore-installed option for the pip package manager was first introduced in version 6.0, which was released in April 2014.
The old install give me this error and when I try to use I got this:
>>> from PyQt6 import *
>>> dir(PyQt6)
['__builtins__', '__cached__', '__doc__', '__file__', '__loader__', '__name__', '__package__', '__path__', '__spec__']
Now after I reinstall with this option the result is good:
>>> import PyQt6
>>> from PyQt6 import QtCore
>>> dir(PyQt6)
['QtCore', '__builtins__', '__cached__', '__doc__', '__file__', '__loader__', '__name__', '__package__', '__path__', '__spec__', 'sip']
>>> from PyQt6.QtCore import QUrl

Saturday, January 7, 2023

Python 3.7.9 : how to fix update errors between pip and setuptools.

The python language was mainly developed to emphasis on code readability.
That's why I think that it should not be affected by such errors, but they are easily fixed ...
    launcher = self._get_launcher('t')
  File "C:\Users\catafest\AppData\Roaming\Python\Python37\site-packages\pip\_vendor\distlib\scripts.py", line 404, in _get_launcher
    raise ValueError(msg)
ValueError: Unable to find resource t64.exe in package pip._vendor.distlib

[notice] A new release of pip available: 22.3 -> 22.3.1
[notice] To update, run: python.exe -m pip install --upgrade pip

C:\PythonProjects\scapy001>python -m pip uninstall pip setuptools
Found existing installation: pip 22.3
Uninstalling pip-22.3:
  Would remove:
    c:\users\catafest\appdata\roaming\python\python37\scripts\pip.exe
    c:\users\catafest\appdata\roaming\python\python37\scripts\pip3.10.exe
    c:\users\catafest\appdata\roaming\python\python37\scripts\pip3.7.exe
    c:\users\catafest\appdata\roaming\python\python37\scripts\pip3.exe
    c:\users\catafest\appdata\roaming\python\python37\site-packages\pip-22.3.dist-info\*
    c:\users\catafest\appdata\roaming\python\python37\site-packages\pip\*
Proceed (Y/n)? y
  Successfully uninstalled pip-22.3
Found existing installation: setuptools 47.1.0
Uninstalling setuptools-47.1.0:
  Would remove:
    c:\python379\lib\site-packages\easy_install.py
    c:\python379\lib\site-packages\pkg_resources\*
    c:\python379\lib\site-packages\setuptools-47.1.0.dist-info\*
    c:\python379\lib\site-packages\setuptools\*
    c:\python379\scripts\easy_install-3.7.exe
    c:\python379\scripts\easy_install.exe
Proceed (Y/n)? y
  Successfully uninstalled setuptools-47.1.0

C:\PythonProjects\scapy001>pip3 install --upgrade pip
Requirement already satisfied: pip in c:\python379\lib\site-packages (22.3.1)

C:\PythonProjects\scapy001>pip install --upgrade setuptools
Collecting setuptools
  Downloading setuptools-65.6.3-py3-none-any.whl (1.2 MB)
     ---------------------------------------- 1.2/1.2 MB 4.1 MB/s eta 0:00:00
Installing collected packages: setuptools
Successfully installed setuptools-65.6.3

Sunday, July 24, 2022

Python 3.11.0a7 : image conversions in Python.

Image processing is very important in development, therefore also in python.
The image processing packages used in python have undergone changes over time.
Pillow and PIL cannot co-exist in the same environment. Before installing Pillow, please uninstall PIL.
Pillow higher than version 10 no longer supports import Image. Please use from PIL import Image instead.
Pillow higher than version 2.1.0 no longer supports import _imaging. Please use from PIL.Image import core as _imaging instead.
Although the image formats are old compared to the newer ones in vector format, they are preferred depending on the field of work.
You can see all of these file image formats on the official python package.
First, the basic installation start with upgrade the pip tool:
C:\PythonProjects\ConvertImages>python -m pip install --upgrade pip
Requirement already satisfied: pip in c:\python311alpha\lib\site-packages (22.1.
2)
Collecting pip
  Downloading pip-22.2-py3-none-any.whl (2.0 MB)
     ---------------------------------------- 2.0/2.0 MB 3.3 MB/s eta 0:00:00
Installing collected packages: pip
  Attempting uninstall: pip
    Found existing installation: pip 22.1.2
    Uninstalling pip-22.1.2:
      Successfully uninstalled pip-22.1.2
Successfully installed pip-22.2
Secondary, the install of the Pillow python package:
C:\PythonProjects\ConvertImages>python  -m pip install --upgrade Pillow
Collecting Pillow
  Downloading Pillow-9.2.0-cp311-cp311-win_amd64.whl (3.3 MB)
     ---------------------------------------- 3.3/3.3 MB 4.0 MB/s eta 0:00:00
Installing collected packages: Pillow
Successfully installed Pillow-9.2.0
I have a webp image here that I have scaled to smaller sizes and that I will test its conversion from webp format to png format.
The image is named waterski2 and I'm using the 3.11.0a7 python version.
Let's see the source code:
from PIL import Image

# open the image file WEBP
image = Image.open('waterski2.webp')

# show the image 
image.show()

# convert the image to RGB color
image = image.convert('RGB')

# save PNG RGB image
image.save('waterski2_RGB_PNG.png', 'png')

# save JPG RGB image
image.save('waterski2_RGB_JPG.jpg', 'jpeg')

# open the image file JPG
image_jpg = Image.open('waterski2_RGB_JPG.jpg')

# convert the image to RGB color
image_rgb_jpg = image_jpg.convert('RGB')

# save PNG RGB image from JPG
image_rgb_jpg.save('new-image_RGB_PNG_from_JPG.png', 'png')

#same process of conversion to WEBP file type
# from png image
image = Image.open('waterski2_RGB_PNG.png')
image = image.convert('RGB')
image.save('new-image_RGB_WEBP_from_png.webp', 'webp')
# from jpg image
image = Image.open('waterski2_RGB_JPG.jpg')
image = image.convert('RGB')
image.save('new-image_RGB_WEBP_from_jpg.webp', 'webp')
Here is a screenshot with these converted images and the processed image.

Wednesday, July 13, 2022

Python 3.11.0a7 : local script for update python packages.

If you want to upgrade all local packages from a local script for pip with version greater than 10.0.1 version use a local python script with this source code:
import pkg_resources
from subprocess import call

packages = [dist.project_name for dist in pkg_resources.working_set]
call("pip install --upgrade " + ' '.join(packages), shell=True)
Run it with the python executable and you will see something like this:
C:\Python311alpha>python.exe update_python.py
...
Requirement already satisfied: pip-api in c:\python311alpha\lib\site-packages (0.0.29)
Requirement already satisfied: pypng in c:\python311alpha\lib\site-packages (0.0.21)
Requirement already satisfied: PyGetWindow in c:\python311alpha\lib\site-packages (0.0.9)
Requirement already satisfied: bs4 in c:\python311alpha\lib\site-packages (0.0.1)

Sunday, March 13, 2022

Python : Issues with python install - part 001.

I use python as an additional programming language for useful little things, testing for tutorials, and because I use the Blender 3D program.
This involves using it in Visual Code and command line with various versions of python that require separate installations.
Although the development team of the python program makes major changes to maintain and improve these separate installations on various versions, especially on the Windows operating system, they put their management in trouble.
There are plenty of examples on the web with questions and answers.
Here's a simple one, if you run the python command line and the Windows store opens then some settings are not set correctly
Use the Start button and on the Windows search bar to find Manage application run aliases.
There should be two python aliases, deselect them, this will allow the usual python aliases python and python3.
This deselect will delete two files on this folder:
cd %localappdata%\Microsoft\WindowsApps

C:\Users\YOUR_USER\AppData\Local\Microsoft\WindowsApps>dir python*
If you select these the file will be in that folder.
To solve this issue you need to deselect all python or remove the python files from the folder: \YOUR_USER\AppData\Local\Microsoft\WindowsApps.
After that, you need to go on Add or remove programs windows settings area from your operating system and repair select your python install press Modify button and select: Add python to environment variables.
This will fix the path for your python installation.
Now the python 3.10.2 installer come with one update feature, see the next screenshot:
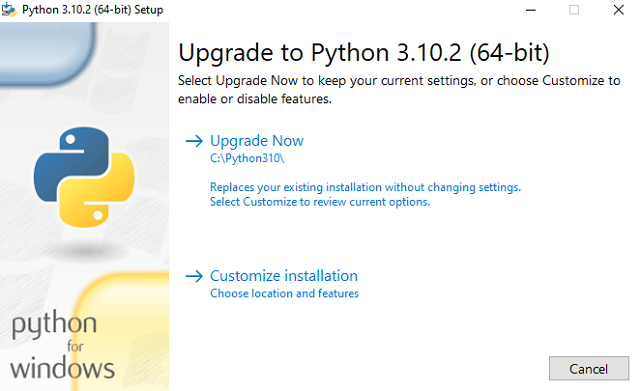
If I run the python command python --version to see my python install on folder C:\Python310, the result is this: Python 3.10.2.
When you enter the python command, it searches the directories listed in your path environment variables page from top to bottom.
Will be great if these python installations will be managed, updated, and fixed properly by the installer, I see something similar in the Unity 3D Hub.
Let's see another example that shows us why it needs well-managed software for python versions.
If you try to install gravityai python package then you can do it easy on colab google with python version 3.7.12.
The bad part comes when you can try to use this version with a simple python windows installer because not all Windows executable installers are available for this python version.
This research needs time and finally, I found a good python version 3.7.9 for this package.
First I got this error:
C:\Python379>python.exe -m pip install --upgrade pip
Requirement already satisfied: pip in c:\users\
...
ERROR: Exception:
...
ValueError: Unable to find resource t64.exe in package pip._vendor.distlib
WARNING: You are using pip version 21.1.3; however, version 22.0.4 is available.
You should consider upgrading via the 'C:\Python379\python.exe -m pip install --upgrade pip' command.
I uninstall the setuptools with this command because python is set to the old install python 3.10.2 and give that error:
python -m pip uninstall pip setuptools
Found existing installation: pip 21.1.3
Uninstalling pip-21.1.3:
...
Uninstalling setuptools-57.2.0:
I upgrade with the pip tool my new python version 3.7.9 version.
python.exe -m pip install --upgrade pip
Requirement already satisfied: pip in c:\python379\lib\site-packages (22.0.4)
The last step is to use python.exe not the python command from my Python379 folder to install the gravityai python package.
C:\Python379>python.exe -m pip install gravityai
Collecting gravityai
  Using cached gravityai-0.1.3.post1.tar.gz (6.5 kB)
  Preparing metadata (setup.py) ... done
Collecting pathlib~=1.0.1
  Using cached pathlib-1.0.1.tar.gz (49 kB)
  Preparing metadata (setup.py) ... done
Collecting websockets~=9.1
  Downloading websockets-9.1-cp37-cp37m-win_amd64.whl (90 kB)
     ---------------------------------------- 90.2/90.2 KB 850.2 kB/s eta 0:00:00
Collecting asyncio~=3.4.3
  Downloading asyncio-3.4.3-py3-none-any.whl (101 kB)
     ---------------------------------------- 101.8/101.8 KB 1.2 MB/s eta 0:00:00
...
Successfully built gravityai pathlib
Installing collected packages: pathlib, asyncio, websockets, gravityai
Successfully installed asyncio-3.4.3 gravityai-0.1.3.post1 pathlib-1.0.1 websockets-9.1
Now I can use this package with python and python.exe commands in the Python379 folder.
Another useful command to have a good image of the install for pip tool is this:
python -m pip install --no-cache-dir  --force-reinstall -Iv gravityai
...
full command: 'C:\Python310\python.exe' -c '
...
exec(compile(setup_py_code, filename, "exec"))
This full output will give you information about the steps for installing the package, in this case, the uninstall and install the setuptools.
This option for the install process is --ignore-installed and let you install a new version of the package and keep the old one, see example command for gravityai package.
pip install gravityai --ignore-installed

Tuesday, February 1, 2022

Python 3.10.0 : How to using wheels.

Wheels are the last component of the Python ecosystem that helps to make package installs easy.
Wheel and Egg are both packaging formats.
The Egg format was introduced by setuptools in 2004, whereas the Wheel format was introduced by PEP 427 in 2012.
You can use it easy with these commands:
C:\Python310>python.exe -m pip install wheel
Collecting wheel
  Downloading wheel-0.37.1-py2.py3-none-any.whl (35 kB)
Installing collected packages: wheel
  WARNING: The script wheel.exe is installed in 'C:\Python310\Scripts' which is not on PATH.
  Consider adding this directory to PATH or, if you prefer to suppress this warning, use --no-warn-script-location.
Successfully installed wheel-0.37.1

C:\Python310>python.exe -m pip install --upgrade pip setuptools wheel
Requirement already satisfied: pip in c:\python310\lib\site-packages (21.3.1)
Collecting pip
  Downloading pip-22.0.2-py3-none-any.whl (2.1 MB)
     |████████████████████████████████| 2.1 MB 2.2 MB/s
Requirement already satisfied: setuptools in c:\python310\lib\site-packages (57.4.0)
Collecting setuptools
  Downloading setuptools-60.6.0-py3-none-any.whl (953 kB)
     |████████████████████████████████| 953 kB 6.8 MB/s
Requirement already satisfied: wheel in c:\python310\lib\site-packages (0.37.1)
Installing collected packages: setuptools, pip
  Attempting uninstall: setuptools
    Found existing installation: setuptools 57.4.0
    Uninstalling setuptools-57.4.0:
      Successfully uninstalled setuptools-57.4.0
  Attempting uninstall: pip
    Found existing installation: pip 21.3.1
    Uninstalling pip-21.3.1:
      Successfully uninstalled pip-21.3.1
  WARNING: The scripts pip.exe, pip3.10.exe and pip3.exe are installed in 'C:\Python310\Scripts' which is not on PATH.
  Consider adding this directory to PATH or, if you prefer to suppress this warning, use --no-warn-script-location.
Successfully installed pip-22.0.2 setuptools-60.6.0

Friday, January 12, 2018

Python 2.7 : Python and BigQuery service object.

Here's another tutorial about python and google. I thought it would be useful for the beginning of 2018.
The Google team tell us:

What is BigQuery?

Storing and querying massive datasets can be time consuming and expensive without the right hardware and infrastructure. Google BigQuery is an enterprise data warehouse that solves this problem by enabling super-fast SQL queries using the processing power of Google's infrastructure. Simply move your data into BigQuery and let us handle the hard work. You can control access to both the project and your data based on your business needs, such as giving others the ability to view or query your data.


This tutorial it follows more precisely the steps from here.
First of all, you must create an authentication file by using the Create service account from your Google project.
Go to Google Console, navigate to the Create service account key page.
From the Service account drop-down, select the New service account.
Input a name into the form field.
From the Role drop-down, select Project and Owner.
The result is a JSON file type (this is for authenticating with google) download it renames and put into your project folder.
Like into the next image:

Now, select from the left area the Library does add the BigQuery API, try this link.
Search for BigQuery API and then use the button ENABLE to use it.
The next step is to install these python modules: pyopenssl and google-cloud-bigquery.
C:\Python27\Scripts>pip install -U pyopenssl
C:\Python27\Scripts>pip install --upgrade google-cloud-bigquery
Add this JSON file to windows path from my test folder:
set GOOGLE_APPLICATION_CREDENTIALS=C:\test\python_doc.json
Because my JSON file is named python_doc.json then this is the name I will use with my python script.
Let's see the script:
import google
from google.cloud import bigquery

def query_shakespeare():
    client = bigquery.Client()
    client = client.from_service_account_json('python_doc.json')
    query_job = client.query("""
        #standardSQL
        SELECT corpus AS title, COUNT(*) AS unique_words
        FROM `bigquery-public-data.samples.shakespeare`
        GROUP BY title
        ORDER BY unique_words DESC
        LIMIT 10""")

    results = query_job.result()  # Waits for job to complete.

    for row in results:
        print("{}: {}".format(row.title, row.unique_words))

if __name__ == '__main__':
    query_shakespeare()
The result is:
C:\Python27>python.exe goo_test_bquerry.py
hamlet: 5318
kinghenryv: 5104
cymbeline: 4875
troilusandcressida: 4795
kinglear: 4784
kingrichardiii: 4713
2kinghenryvi: 4683
coriolanus: 4653
2kinghenryiv: 4605
antonyandcleopatra: 4582
NOTE: Take care of the JSON file because it gives access to your google account and tries to use the restrictions according to the application's requirements.

Monday, August 21, 2017

Using pip into shell to install and use pymunk.

The tutorial for today will show how to use pip into the python shell to install a python package.
The first step is shown in the next image:

Tuesday, June 21, 2016

Scrapy python module - part 001.

To install pip under python 2.7.8, securely download get-pip.py into Python27 folder.
Use this command:

C:\Python27\python.exe get-pip.py
...
C:\Python27\Scripts>pip2.7.exe install urllib3
C:\Python27\Scripts>pip2.7 install requests
C:\Python27\Scripts>pip install Scrapy

Some of python modules are installed:

Successfully built PyDispatcher pycparser
Installing collected packages: cssselect, queuelib, six, enum34, ipaddress, idna, pycparser, cffi, pyasn1, cryptography, pyOpenSSL, w3lib, lxml, parsel, PyDispatcher, zope.interface, Twisted, attrs, pyasn1-modules, service-identity, Scrapy
Successfully installed PyDispatcher-2.0.5 Scrapy-1.1.0 Twisted-16.2.0 attrs-16.0.0 cffi-1.7.0 cryptography-1.4 cssselect-0.9.2 enum34-1.1.6 idna-2.1 ipaddress-1.0.16 lxml-3.6.0 parsel-1.0.2 pyOpenSSL-16.0.0 pyasn1-0.1.9 pyasn1-modules-0.0.8 pycparser-2.14 queuelib-1.4.2 service-identity-16.0.0 six-1.10.0 w3lib-1.14.2 zope.interface-4.2.0


>>> print scrapy.version_info
(1, 1, 0)


>>> help(scrapy)
PACKAGE CONTENTS
_monkeypatches
cmdline
command
commands (package)
conf
contracts (package)
contrib (package)
contrib_exp (package)
core (package)
crawler
downloadermiddlewares (package)
dupefilter
dupefilters
exceptions
exporters
extension
extensions (package)
http (package)
interfaces
item
link
linkextractor
linkextractors (package)
loader (package)
log
logformatter
mail
middleware
pipelines (package)
project
resolver
responsetypes
selector (package)
settings (package)
shell
signalmanager
signals
spider
spiderloader
spidermanager
spidermiddlewares (package)
spiders (package)
squeue
squeues
stats
statscol
statscollectors
telnet
utils (package)
xlib (package)
...


C:\Python27\c:\Python27\Scripts\scrapy.exe startproject test_scrapy
New Scrapy project 'test_scrapy', using template directory 'c:\\python27\\lib\\site-packages\\scrapy\\templates\\project', created in:
C:\Python27\test_scrapy

You can start your first spider with:
cd test_scrapy
scrapy genspider example example.com

C:\Python27\cd test_scrapy

C:\Python27\test_scrapy>tree
Folder PATH listing
Volume serial number is 9A67-3A80
C:.
└───test_scrapy
└───spiders

Now you need to install win32api with this python module:
pip install pypiwin32
...
Downloading pypiwin32-219-cp27-none-win_amd64.whl (7.3MB)
100% |################################| 7.3MB 61kB/s
Installing collected packages: pypiwin32
Successfully installed pypiwin32-219

... and test scrapy bench:
C:\Python27\Scripts\scrapy.exe bench
2016-06-21 22:45:20 [scrapy] INFO: Scrapy 1.1.0 started (bot: scrapybot)
2016-06-21 22:45:20 [scrapy] INFO: Overridden settings: {'CLOSESPIDER_TIMEOUT': 10, 'LOG_LEVEL': 'INFO', 'LOGSTATS_INTERVAL': 1}
2016-06-21 22:45:39 [scrapy] INFO: Enabled extensions:
['scrapy.extensions.closespider.CloseSpider',
'scrapy.extensions.logstats.LogStats',
'scrapy.extensions.telnet.TelnetConsole',
'scrapy.extensions.corestats.CoreStats']
2016-06-21 22:45:46 [scrapy] INFO: Enabled downloader middlewares:
['scrapy.downloadermiddlewares.httpauth.HttpAuthMiddleware',
'scrapy.downloadermiddlewares.downloadtimeout.DownloadTimeoutMiddleware',
'scrapy.downloadermiddlewares.useragent.UserAgentMiddleware',
'scrapy.downloadermiddlewares.retry.RetryMiddleware',
'scrapy.downloadermiddlewares.defaultheaders.DefaultHeadersMiddleware',
'scrapy.downloadermiddlewares.redirect.MetaRefreshMiddleware',
'scrapy.downloadermiddlewares.httpcompression.HttpCompressionMiddleware',
'scrapy.downloadermiddlewares.redirect.RedirectMiddleware',
'scrapy.downloadermiddlewares.cookies.CookiesMiddleware',
'scrapy.downloadermiddlewares.chunked.ChunkedTransferMiddleware',
'scrapy.downloadermiddlewares.stats.DownloaderStats']
2016-06-21 22:45:46 [scrapy] INFO: Enabled spider middlewares:
['scrapy.spidermiddlewares.httperror.HttpErrorMiddleware',
'scrapy.spidermiddlewares.offsite.OffsiteMiddleware',
'scrapy.spidermiddlewares.referer.RefererMiddleware',
'scrapy.spidermiddlewares.urllength.UrlLengthMiddleware',
'scrapy.spidermiddlewares.depth.DepthMiddleware']
2016-06-21 22:45:46 [scrapy] INFO: Enabled item pipelines:
[]
2016-06-21 22:45:46 [scrapy] INFO: Spider opened
2016-06-21 22:45:46 [scrapy] INFO: Crawled 0 pages (at 0 pages/min), scraped 0 items (at 0 items/min)
2016-06-21 22:45:48 [scrapy] INFO: Crawled 27 pages (at 1620 pages/min), scraped 0 items (at 0 items/min)
2016-06-21 22:45:49 [scrapy] INFO: Crawled 59 pages (at 1920 pages/min), scraped 0 items (at 0 items/min)
2016-06-21 22:45:50 [scrapy] INFO: Crawled 85 pages (at 1560 pages/min), scraped 0 items (at 0 items/min)
2016-06-21 22:45:51 [scrapy] INFO: Crawled 123 pages (at 2280 pages/min), scraped 0 items (at 0 items/min)
2016-06-21 22:45:52 [scrapy] INFO: Crawled 149 pages (at 1560 pages/min), scraped 0 items (at 0 items/min)
2016-06-21 22:45:53 [scrapy] INFO: Crawled 181 pages (at 1920 pages/min), scraped 0 items (at 0 items/min)
2016-06-21 22:45:54 [scrapy] INFO: Crawled 211 pages (at 1800 pages/min), scraped 0 items (at 0 items/min)
2016-06-21 22:45:55 [scrapy] INFO: Crawled 237 pages (at 1560 pages/min), scraped 0 items (at 0 items/min)
2016-06-21 22:45:56 [scrapy] INFO: Crawled 269 pages (at 1920 pages/min), scraped 0 items (at 0 items/min)
2016-06-21 22:45:57 [scrapy] INFO: Closing spider (closespider_timeout)
2016-06-21 22:45:57 [scrapy] INFO: Crawled 307 pages (at 2280 pages/min), scraped 0 items (at 0 items/min)
2016-06-21 22:45:57 [scrapy] INFO: Dumping Scrapy stats:
{'downloader/request_bytes': 97844,
'downloader/request_count': 317,
'downloader/request_method_count/GET': 317,
'downloader/response_bytes': 469955,
'downloader/response_count': 317,
'downloader/response_status_count/200': 317,
'dupefilter/filtered': 204,
'finish_reason': 'closespider_timeout',
'finish_time': datetime.datetime(2016, 6, 21, 19, 45, 57, 835000),
'log_count/INFO': 17,
'request_depth_max': 14,
'response_received_count': 317,
'scheduler/dequeued': 317,
'scheduler/dequeued/memory': 317,
'scheduler/enqueued': 6136,
'scheduler/enqueued/memory': 6136,
'start_time': datetime.datetime(2016, 6, 21, 19, 45, 46, 986000)}
2016-06-21 22:45:57 [scrapy] INFO: Spider closed (closespider_timeout)

Into the next tutorial I will try to use scrapy.
If you have some ideas about how to do the next step just send me one comment.


Sunday, April 19, 2015

Upgrading all packages with pip using python script.

Can be done under Windows OS with this python script :
C:\Python27>python.exe
Python 2.7.6 (default, Nov 10 2013, 19:24:24) [MSC v.1500 64 bit (AMD64)] on win
32
Type "help", "copyright", "credits" or "license" for more information.
>>> import pip
>>> from subprocess import call
>>>
>>> for dist in pip.get_installed_distributions():
...     call("pip install --upgrade " + dist.project_name, shell=True)
...
You are using pip version 6.0.8, however version 6.1.1 is available.
You should consider upgrading via the 'pip install --upgrade pip' command.
Requirement already up-to-date: appdirs in c:\python34\lib\site-packages
0
You are using pip version 6.0.8, however version 6.1.1 is available.
You should consider upgrading via the 'pip install --upgrade pip' command.
Collecting beautifulsoup4
  Using cached beautifulsoup4-4.3.2.tar.gz
...
The Windows will need to have the Script path folder into enviroment variables: C:\Python27\Scripts.
If you use Linux OS shell then you can use this :
pip freeze --local | grep -v '^\-e' | cut -d = -f 1  | xargs -n1 pip install -U

Saturday, April 18, 2015

pip-Win the new GUI for python pip.

The pip-Win is a Python Package manager that is easy to install and let you to automatically installs python module using pip and virtualenv on Windows.
Features
  • switch from one python interpreter (i.e. version) to another (including py and pypy)
  • see all installed packages, and whether they are up-to-date
  • install or upgrade a package, or upgrade pip itself
  • create and delete virtual environments, and switch between them
  • run the IDLE or another python script, with the selected interpreter

Also pip-Win is made available under the GNU Lesser General Public Licence.
You can try it from here.

Saturday, February 7, 2015

Install PyOpenGL with pip with wheel and WHL file .

This is a old tutorial I wrote about how to install python on windows 8.1 with distribute, pip, virtualenv and virtualenvwrapper-powershell.
Now I will show you how to deal with WHL files and pip wheel.
First you need to install pip under your python folder.
I used in this case Python 2.7 version.
The WHL file and wheel is a ZIP-format archive with a specially formatted filename and the .whl extension.
You can use this :
C:\Python27\Scripts>pip2.7 install wheel
Collecting wheel
  Downloading wheel-0.24.0-py2.py3-none-any.whl (63kB)
    100% |################################| 65kB 682kB/s ta 0:00:011
Installing collected packages: wheel

Successfully installed wheel-0.24.0

C:\Python27\Scripts>pip2.7 install --upgrade pip
Collecting pip from https://pypi.python.org/packages/py2.py3/p/pip/pip-6.0.8-py2
.py3-none-any.whl#md5=41e73fae2c86ba2270ff51c1d86f7e09
  Downloading pip-6.0.8-py2.py3-none-any.whl (1.3MB)
    100% |################################| 1.3MB 952kB/s ta 0:00:01
This will install wheel and update the pip2.7 .
For example, just use next command to install OpenGL python module.
C:\Python27\Scripts>pip2.7 install PyOpenGL
Collecting PyOpenGL
  Downloading PyOpenGL-3.1.0.tar.gz (1.2MB)
    100% |################################| 1.2MB 2.2MB/s ta 0:00:01
Installing collected packages: PyOpenGL
  Running setup.py install for PyOpenGL
Successfully installed PyOpenGL-3.1.0
Also pygame whl working with pip2.7.
I download it from pygame website, from here. Download your version of WHL file ( amd64 is for CPU 64 bits) and your python version (cpxx). Now use this command:
C:\Python27\Scripts>pip2.7.exe install "C:\Downloads\pygame-1.9.2a
0-cp27-none-win_amd64.whl"
...
Installing collected packages: pygame
  Found existing installation: pygame 1.9.1
    DEPRECATION: Uninstalling a distutils installed project (pygame) has been de
precated and will be removed in a future version. This is due to the fact that u
ninstalling a distutils project will only partially uninstall the project.
    Uninstalling pygame-1.9.1:
      Successfully uninstalled pygame-1.9.1

Successfully installed pygame-1.9.2a0

Sunday, February 2, 2014

Install python on windows 8.1 with distribute, pip, virtualenv and virtualenvwrapper-powershell .

Today I wand to show you something new. The goal is using python under Windows OS (Windows 8.1).

This tutorial will cover the instalation of Python 2.7 with distribute (0.7.3), pip (1.5.2), virtualenv (1.11.2) and virtualenvwrapper-powershell.

The default instalation folder I used is under C: drive

I used python 2.7.6.

It's a executable file ... just run it.

Now you have: C:\Python27\ folder with all files.

We need to using also the fork of the Setuptools project named distribute.

Download distribute zip file from python distribute 0.7.3.

Unarhive the file under C: drive and you will have C:\distribute-0.7.3 folder.

Go to distribute and let's install it.

C:\>cd distribute-0.7.3
C:\distribute-0.7.3>\Python27\python.exe setup.py --help
C:\distribute-0.7.3>\Python27\python.exe setup.py build
C:\distribute-0.7.3>\Python27\python.exe setup.py install

Also we need to install pip , see this pip webpage.

You need to get this python script from here.

Put this script into C:\Python27 folder and use this command to install pip.

C:\Python27>python.exe get-pip.py

Under site-packages you can see the pip and distribute ...

C:\Python27\Lib\site-packages>dir /w
 Volume in drive C has no label.
 Volume Serial Number is 9AE5-9AC9

 Directory of C:\Python27\Lib\site-packages

[.]
[..]
distribute-0.7.3-py2.7.egg
easy-install.pth
[pip]
[pip-1.5.2.dist-info]
README.txt
setuptools.pth
[virtualenv-1.11.2.dist-info]
virtualenv.py
virtualenv.pyc
[virtualenvwrapper_powershell-12.7.8-py2.7.egg-info]
[virtualenv_support]

Let's see if this python modules working ...

C:\Python27>python.exe
Python 2.7.6 (default, Nov 10 2013, 19:24:24) [MSC v.1500 64 bit (AMD64)] on win32
Type "help", "copyright", "credits" or "license" for more information.
>>> import distutils
>>> import pip
>>>

Edit your environment variable by adding: ";C:\Python27\Scripts\" and ";C:\Python27\", see image below:

After that you can restart the command shell or your windows os.

I just restart the command shell and working well with the new environment vars...


Now we need to install virtualenv and virtualenvwrapper-powershell using pip:

C:\>pip install virtualenv
C:\>pip install virtualenvwrapper-powershell

The virtualenv kit provides the ability to create virtual Python environments that do not interfere with either each other, or the main Python installation.

And virtualenvwrapper-powershell it's a PowerShell clone of Doug Hellmann's virtualenvwrapper.

C:\Python27>pip list
distribute (0.7.3)
pip (1.5.2)
setuptools (0.8b2)
virtualenv (1.11.2)
virtualenvwrapper-powershell (12.7.8)

... and this is all for today.

Thursday, September 12, 2013

How to fix error: fatal error: Python.h: No such file or directory

This is a common error when your system don't have the python-dev.

I got this error when I try to use : pip .

Just install the package python-dev and then all will working well.

Saturday, January 26, 2013

The sandboxed Python - development environments using pip and virtualenv .

Use pip and virtualenv and you can make sandboxed Python development environments.

With this tools such as pip and virtualenv you have total control over the development environment.

Why? Because if your project is developed by a team with mutiple developers then they prefer having exactly replicated environments.

Let's try some simple example commands:

1. Start your environment ( in my case is: my_new_env ).

[free-tutorials@free-tutorials ~]$ python virtualenv.py my_new_env
New python executable in my_new_env/bin/python
Installing setuptools..................done.
Installing pip.............done.

Activate your environment ( in my case is: my_new_env ).

[free-tutorials@free-tutorials ~]$ . my_new_env/bin/activate

Let's see the pip --help command :

(my_new_env)[free-tutorials@free-tutorials ~]$ pip --help
Usage: pip COMMAND [OPTIONS]
 --version                    show program's version number and exit
 -h, --help                   Show help
 -v, --verbose                Give more output
 -q, --quiet                  Give less output
 --log <filename>             Log file where a complete (maximum verbosity)
                              record will be kept
 --proxy <proxy>              Specify a proxy in the form
                              user:passwd@proxy.server:port. Note that the
                              user:password@ is optional and required only if
                              you are behind an authenticated proxy. If you
                              provide user@proxy.server:port then you will be
                              prompted for a password.
 --timeout <seconds>          Set the socket timeout (default 15 seconds)
 --exists-action <exists_action>
                              Default action when a path already exists. Use
                              this option more than one time to specify
                              another action if a certain option is not
                              available. Choices: (s)witch, (i)gnore, (w)ipe,
                              (b)ackup

Commands available:
  bundle: Create pybundles (archives containing multiple packages)
  freeze: Output all currently installed packages (exact versions) to stdout
  help: Show available commands
  install: Install packages
  search: Search PyPI
  uninstall: Uninstall packages
  unzip: Unzip individual packages
  zip: Zip individual packages

Now we will use freeze and install.

I will list all the pip packages used in my virtual environment.

(my_new_env)[free-tutorials@free-tutorials ~]$  pip freeze -l
PyOpenGL==3.0.2
PyOpenGL-accelerate==3.0.2

Put all the output in my_packages.txt file.

(my_new_env)[free-tutorials@free-tutorials ~]$ pip freeze -l > my_packages.txt

Install my packages from my_packages.txt .

(my_new_env)[free-tutorials@free-tutorials ~]$ pip install -r my_packages.txt
Requirement already satisfied (use --upgrade to upgrade): PyOpenGL==3.0.2 in 
./my_new_env/lib/python2.7/site-packages (from -r my_packages.txt (line 1))
Requirement already satisfied (use --upgrade to upgrade): PyOpenGL-accelerate==3.0.2 in 
./my_new_env/lib/python2.7/site-packages (from -r my_packages.txt (line 2))
Cleaning up...

Let's try now to find one python module : opencv .

(my_new_env)[free-tutorials@free-tutorials ~]$ pip search opencv 
remotecv                  - remotecv is an OpenCV server for facial and
                            feature recognition
ctypes-opencv             - ctypes-opencv - A Python wrapper for OpenCV using
                            ctypes
pyopencv                  - PyOpenCV - A Python wrapper for OpenCV 2.x using
                            Boost.Python and NumPy
opencv-cython             - An alternative OpenCV wrapper
CVtypes                   - Python OpenCV wrapper using ctypes
Tippy                     - another Toolbox for Image Processing in PYthon,
                            based on OpenCV

You can see where the version of python you are using installs to by running it the next python code.

>>> import sys
>>> sys.prefix
'/home/free-tutorials/my_new_env'
>>> sys.exec_prefix
'/home/free-tutorials/my_new_env'

To leave your environment just type next command: $ deactivate.

I will come with new tutorials about pip and virtualenv .

See you later.

Tuesday, December 11, 2012

Using pip for installing and managing Python packages.

An easy_install replacement is pip.

So pip installs packages and managing Python packages.

Let's try to install packages.

$ pip install PyOpenGL_accelerate
bash: pip: command not found 

Install the pip package.

The recommended way to use pip is within virtualenv, since every virtualenv has pip installed in it automatically.

[free-tutorials@free-tutorials ~]$ 
curl -O https://raw.github.com/pypa/virtualenv/master/virtualenv.py
...
[free-tutorials@free-tutorials ~]$ python virtualenv.py my_new_env
New python executable in my_new_env/bin/python
Installing setuptools............................done.
Installing pip.....................done.
[free-tutorials@free-tutorials ~]$ . my_new_env/bin/activate
(my_new_env)[free-tutorials@free-tutorials ~]$ pip --help

Let's try again with PyOpenGL and PyOpenGL_accelerate packages.

(my_new_env)[free-tutorials@free-tutorials ~]$
 pip install PyOpenGL PyOpenGL_accelerate
Downloading/unpacking PyOpenGL
  Downloading PyOpenGL-3.0.2.tar.gz (891kB): 891kB downloaded
  Running setup.py egg_info for package PyOpenGL
      ....
      

Now we can test this two packages.First is PyOpenGL.

(my_new_env)[free-tutorials@free-tutorials ~]$ python 
Python 2.7.3 (default, Dec  6 2012, 03:02:26) 
[GCC 4.3.2 20081105 (Red Hat 4.3.2-7)] on linux2
Type "help", "copyright", "credits" or "license" for more information.
>>> import OpenGL
>>> dir(OpenGL)

...and PyOpenGL_accelerate:

(my_new_env)[free-tutorials@free-tutorials ~]$ python 
Python 2.7.3 (default, Dec  6 2012, 03:02:26) 
[GCC 4.3.2 20081105 (Red Hat 4.3.2-7)] on linux2
Type "help", "copyright", "credits" or "license" for more information.
>>> import OpenGL_accelerate
>>> dir(OpenGL_accelerate)

This is working only on my_new_env.

That is all for now. I will try to do some examples with this packages.